Installation
Pre-requisites and Go Connect Server Configuration
Go Connect Server Configuration
Please refer to the Go Connect Server Installation Guide for pre-requisites and setup information relating to Go Connect Mobile.
Provisioning
Go Connect Mobile user configurations can be preconfigured on the server so that the end user need only enter the IP address of the Go Connect server after installing the app on the phone. The server recognizes the user's mobile device and automatically provisions user parameters. Note: manual set up is also available – see Go Connect Server Installation Guide for more details.
GSM
Go Connect Mobile uses the dialer presented by the Android operating system (normally a GSM dialer) on your mobile device to make and receive calls – it does not install an IP phone.
Client Installation
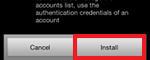
Go Connect Mobile can be downloaded from the Play Store. The easiest way to find it is to search for Go Connect Mobile. Installation from here on is simple. Click the Install button when given the opportunity. The app will then automatically install to your mobile device.
Client Configuration
Shortcuts
Before you can get started making calls with Go Connect Mobile, you need to configure the client so launch the app by tapping the shortcut that has been placed in your Applications menu.
If you would prefer, you can add a shortcut to your device's home page. You will find the app's shortcut by holding your finger on a home page with some space to open the Add to Home menu, then tap Shortcuts, then Applications and you will find the Go Connect shortcut in there. Tap on the shortcut to add it and then you can move it around as you wish.
Welcome Screen and Server Configuration Menu
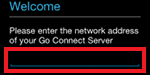
When Go Connect Mobile opens for the first time, you will be presented with the Welcome screen.
Tap the blue bar, then enter the IP address of your Go Connect Server (note: if your administrator has given you a TCP port number then you should add it to the IP address separated by a colon (:) e.g. 192.155.123.1:12345). Tap the Next button once the details are entered and then Go Connect Mobile will check to see if your system administrator has preconfigured your settings.
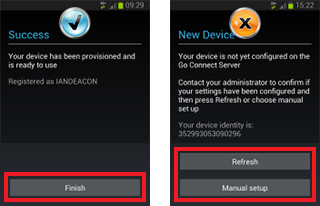
If they have preconfigured your settings, you should see a message telling you that the configuration has been successful; tap the Finish button to start using Go Connect Mobile (you can skip the rest of this section too).
If your settings have not been preconfigured, you will see a screen giving you two options. Tapping Refresh will cause Go Connect Mobile to check again for your preconfigured settings. Use this if you have contacted your system administrator asking him to setup your settings. To configure Go Connect Mobile yourself, select 'Manual setup' to open the main Settings menu.
Note: You can access the Settings menu during normal use of Go Connect Mobile by pressing your device's Menu button to reveal the app's main menu and then tapping the Settings option.
In the Settings menu, tap on Connection to access the first group of settings we need to configure.
Tap on the options in the Login section to enter the following details:
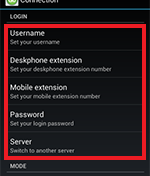
Username: Enter the username given to you by your administrator. This should match the username which is set up in your Go Connect Server user settings.
Deskphone extension: Enter the extension number that represents your deskphone on the phone system. This may be the same as your mobile extension.
Mobile extension: Enter the extension number that represents your mobile device on the phone system. This may be the same as your deskphone extension but is more often a different virtual extension number. This can be left blank if the device is only used in deskphone mode.
Password: The password you need to enter here is your Go Connect Server User password that is set in your User record in Go Connect Server.
Server address: The details you entered on the Welcome screen should already be in place here. If not, enter the IP address of your Go Connect Server. To use a specific port number, append it to the IP address using a colon e.g. 192.0.2.1:12345. To force an encrypted TLS connection (advised), you must append TCP port 21051 (default), or the port number provided by your administrator, to the public IP address as explained above.
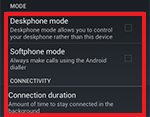
The following settings are optional; In the Mode section, the app can be put into Deskphone Mode by ticking the box. This mode enables the app to control an adjacent device (typically your desk extension) instead of the device where Go Connect Mobile is installed.
Tick the Softphone Mode option if you have a softphone installed on your mobile device and you do not want Go Connect Mobile to modify the dial string to a format suitable for your GSM dialer. Note: this mode of operation is only recommended when a Wi-Fi connection is available.
In the Connection section, tapping Connection Duration will open a submenu where you can select how long the app should remain connected to the telephone server in a session before disconnecting automatically. This is useful if you need to conserve battery power or bandwidth although Go Connect Mobile is not particularly hungry for either.
Click your device's Back button to save your settings and return to the Settings menu. At this point Go Connect Mobile is configured to connect to and communicate with Go Connect Server but you also need to configure the Dial Through settings to make full use of Go Connect Mobile.
Preconfigured Settings
If your mobile client settings have been preconfigured by your System Administrator then the login options will be grayed out and unavailable for editing.
Switch to another Server
To change the server your mobile device is registered with, click on the option which displays the IP address of your current Go Connect Server. You will be prompted with a new screen where you will need to enter a new Go Connect Server IP Address. If your mobile client settings have been previously preconfigured on the new server then your client will automatically refresh the login and configuration settings and connect to the new server. If however, your device hasn't been previously preconfigured you will have to follow the steps mentioned in the Welcome Screen and Server Configuration Menu section for the manual configuration.
Dial Through Configuration Menu
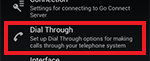
From the Application Preferences menu, tap on the Dial Through option; it's just under the Connection option we used a moment ago.
We will properly cover the options in the Number Preferences section later in the guide (see Whitelist and Blacklist). For now, we'll just tell you that we call them the whitelist and the blacklist and they form a way set rules for numbers that will always or never be routed through Dial Through.
Tap each option in the Dial Through Settings section and enter the following details:
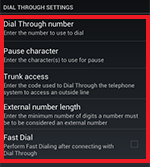
Dial Through Number: Enter the pilot number for your DISA / Auto-attendant system. Enter the entire DID number to dial; entering only the last half of the DID number will not work.
Pause character: Enter the character used by your telephone system to indicate a pause e.g. "," (a comma).
Trunk access: Enter the code used by your telephone system's Dial Through to access an outside line e.g. 9 is common.
External number length: Enter the number of digits an external telephone number would be expected to have i.e. a telephone number with fewer digits than the value entered here will be considered an internal number by Go Connect Mobile.
Fast Dial: Enabling Fast Dial by ticking the Fast Dial tick box will significantly reduce the connection times that are normally associated with Dial Through dialing; this feature requires Wi-Fi/3G or better.
Click your device's Back button to save your settings and go back to the previous menu. At this point Go Connect Mobile is configured to connect to and communicate with Go Connect Server as well as make and receive Dial Through calls. You can tap the OK button to save your settings and start using Go Connect Mobile or configure the following optional settings to enhance and tailor your user experience.
Interface Configuration Menu
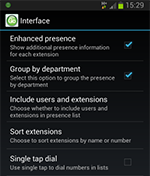
Enhanced presence: Tick this option to show additional information for each extension on the Presence screen.
Group by Department: Tick this option if you want the app to arrange the extensions into the department groups stored on Go Connect Server.
Include Users and Extensions: Tap this option to open a submenu where you can select to see only extensions, only users or both on the Presence screen. This option is particularly useful when users move around the office a.k.a. hotdesking. Displaying users shows you which users are available or busy etc. by the colour of a user's icon. (see Presence Icons below for full details and also see Android Basics/Glossary for more info on users)
Sort extensions: Tap this option to open a submenu where you can select to sort the extensions on the Presence screen by name or number; just tap the appropriate option and then tap your device's Back button to save.
Single tap dial: Tick this option to if you want to use a single tap to dial numbers shown in the Presence, Directory and Call History tabs; when this option is not ticked, a single tap will open the Actions menu.
Tap your device's Back button to save your settings and go back to the previous menu.
Advanced settings
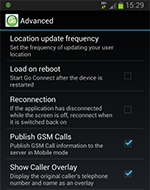
Location Update Frequency: Tap this option to open a submenu where you can select how often your user location is updated; you can select from 5, 10 and 60 minutes or never. This feature uses geo-location data from the user's mobile device to display their actual location in the Location column of the Presence window on Go Connect Client for PC desktop clients. Setting this option to Never will disable the feature i.e. the user's location will not be displayed in the Location column. Note: Go Connect Server requires an internet connection for this feature.
Load on reboot: Tick this option to start Go Connect Mobile automatically when your phone reboots.
Reconnection: Tick this option to make Go Connect Mobile reconnect automatically if it has disconnected while the screen is off.
Publish GSM Calls: Tick this option to publish your GSM call state (on hook or off hook) to the Go Connect Server (only applicable in Mobile mode). Un-ticking this option means the call state is not displayed in colleagues' presence windows.
Show Caller Overlay: Display the original caller's telephone number and name as an overlay.
Tap the OK button to save your settings and get back to the app's main interface where the list of extensions will be downloaded to your device; this usually only takes a few seconds. The Go Connect Mobile icon (seen in the indicator icon area) will turn green to indicate the app has connected to your telephone system.
 Report this page